Sunday, June 17, 2012

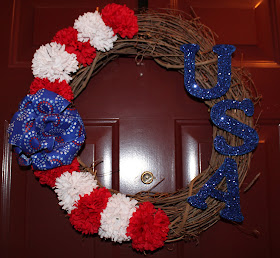
Another Take on Front Door Wreath-USA Style


With 4th of July quickly approaching I knew I needed to make a new wreath to celebrate the occasion. Unfortunately, the overly creative juices weren't flowing and I had already found this great ribbon at the Dollar Tree so I went with the fall back wreath plan of my Front Door Wreaths. I love the variation for the holiday though and you know the old saying...if it ain't broke don't fix it. ;)

I have included as much of a tutorial as I could this time. Hope you enjoy!

Materials:

  • grapevine wreath (or form of your choice)
  • wired patriotic ribbon (Mine is from Dollar Tree but I know Michael's also has a good selection.)
  • USA wooden letters (These are from Hobby Lobby.)
  • blue paint
  • blue glitter
  • mod podge
  • flowers (I got the red, white, and blue bunches from Michael's but only used the red and white.)
  • floral wire
1. I started with painting the letters so that the coats could dry as I worked on other things. I always paint 2-3 coats so the wood doesn't show through.


2. Cut flowers from stems and attach to grapevine wreath. I decided not to use floral wire this time to attach the flowers. Since they are small and the stems were long I was able to securely attach them into the vine of the wreath. Now, for a more permanent wreath I would definitely use wire but this is only going to be up for a couple of weeks so it should hold. (Crossing fingers. ;) )


3. Make a bow. Now, this is the way I make bows but there are many more methods out there so follow your hearts desire on this one. I used the whole roll (9 feet!) to make this bow and I love the size but it is just a bit large. Hehe. I love a big bow though! I also knew there wasn't anything else I really needed this ribbon for so I figured use it up. But you could certainly use less.


Make loops of the ribbon in the width that you want. All you have to do is wrap the ribbon around itself several times.


Fold the ribbon loops in half.


Cut the corners where you folded.


It will look like this after you have cut it.


Unfold the loops and wrap a piece of floral wire around the center to pinch the bow together.


Unfold the loops and pull them in different directions.

4. Attach the bow to the wreath using floral wire and fluff!


5. Add glitter to your letters. This isn't necessary but something about 4th of July screams glitter to me so I went for it! 


Paint on a layer of Mod Podge. 


Sprinkle as much glitter on as you want.

6. Attach the letters to the wreath. I put a dab of hot glue on the back and attach floral wire to it. Let the glue dry and then wrap the wires around the wreath. For more permanent wreaths I also glue the letters directly onto the wreath for added security but again, felt that I could do without this time.


7. Hang and admire. 


And thank God and the men and women who serve our country for our freedom. 

Happy Independence Day!

Monday, June 11, 2012

Pinterest Inspired-Map Frame

I'm addicted to Pinterest. I'm sure that comes as no surprise. I was having dinner with some friends this past week in which of all my recipes were from Pinterest. My friends were teasing me that I ALWAYS show up on their feed with new pins. What can I say? I just love the whole idea of it! 

Anyway, I have pinned thousands of things but haven't accomplished much in making anything the last several months. But it's summer now so hopefully I'll be able to add more to the blog soon. This next project was inspired by several different versions of maps about love and relationships that I have seen. My cousin is in the Navy so he and his wife have moved several times in the course of their marriage. I gave this to them as a gift on their way to their newest home. They absolutely loved it! 


I started by printing maps  of the areas where they lived. I then cut the area into the heart shape using a stencil. After that, I used the smaller red heart to mark the city where they had lived and wrote the state name below as seen in the picture above.


For the middle section I made a collage of pictures that I had of the happy couple. They are a young couple so I didn't have access to various ages or stages of their relationship. I tried to include pictures from different places since that was the theme of the piece. I think it would be really sweet to do this for an older couple with pictures from various stages of their life. I then typed the saying into my computer and printed it onto vellum paper so that you would still be able to see the pictures. I layered those two parts together and stuck them in the frame.


And this is the finished product! It took me less than an hour and I absolutely love it. My cousin's wife was also excited that there was still room on the sides to add more because in all likelihood they'll be making their home somewhere else again. Lucky for them, home is where the heart is! ;) 

Be on the look out for another Pinterest inspired framed piece soon. Two of my besties are having babies within the month and I have a sweet little project for them but can't reveal it yet. In the meantime, happy creating and happy pinning friends! 

Sunday, May 27, 2012

Latest Maternity Photo Shoots

This year has brought wonderful news from many of my friends. As my dear friends Laura and Tommy Bay hoped for...BABIES EVERYWHERE! I am so excited for all of my friends having babies this year and can't wait to meet all of them. This is such a fun and special season in all our lives.

I've done two maternity photo shoots and am excited to share the photos with you. The first one is with the Bremers who welcomed baby girl #2 into their lives April 30. She looks just like her momma and is precious. It was such a joy photographing this sweet family and sharing in their excitement. Big sister Savannah was ready for her baby sister! Here are few of their photos:


This second shoot is with the Edmonsons who are anxiously awaiting the birth of their first, a little boy. He is due July 4 and I can't wait to meet him. These two were so much fun and their excitement for their sweet little one is so precious.